Month: April 2020

Stampin’ Up! Forever Blossoms with Decorative Masks Video Tutorial

April 15, 2020

I just loved how CAS this card is and how simply easy it was to create!

It is hard to see in the photo but the card is kind of like a one layer card. The black frame was positioned around the floral image. Here is how I stenciled the front with the Pattern Party Decorative Masks.


I even got fancy and stenciled the inside of the card leaving the middle open for writing:)

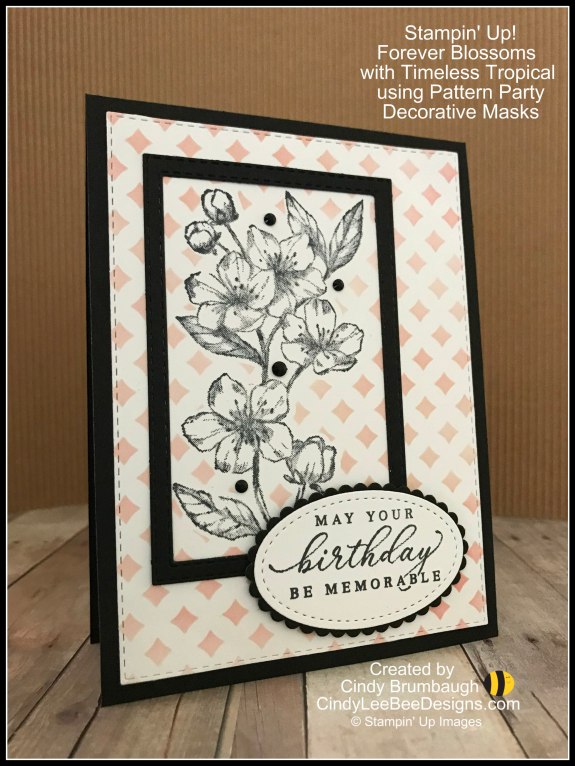
I went against the rule of threes and put four black rhinestones on the card;)

Thanks for buzzing by, friends…


Measurements:
Card Base: 4-1/8″ x 11″ scored at 5-1/2″ on the 11″ side
Whisper White Stitched Rectangles:  (2) 4-1/4′ x 5-1/2″, one for inside and one you can die cut the largest 3-7/8″ x 5-1/8″ rectangle
2-1/2″ square scrap for stitched oval  that is 2-1/4″ x 1-15/16″
Basic Black: Layer the 2-5/8″ x 4″ Stitched Rectangle around the 2-1/4″ x 3-5/8″ Stitched Rectangle and die cut to create a frame,
die cut the scalloped oval from rectangle inside of frame

The Pattern Party Decorative Masks really add something to a card…did you see this one I did with my March 2020 Paper Pumpkin?


Product List

Stampin’ Up! Ornate Thanks with Ornate Layers Dies

April 13, 2020

Happy Monday morning, peeps!

I had fun pulling out some pretty colors from the Ornate Garden Specialty Designer Series Paper on this card along with a lot of other fun items in the Ornate Garden Suite.

A sneak peek on the DSP package says it has BumbleBee as a color…I am thinking it is the inside of the white flowers. I thought the lighter yellow colored flowers by the white ones looked like So Saffron so I used that as my card stock to die cut the Ornate Layer. I Iayered it on top of a Whisper White Stitched Rectangle embossed with the Ornate Floral 3D Embossing Folder.

Do you like the Pear Pizzazz borders on the top and bottom of the DSP? I die cut the DSP with a Stitched Rectangle that fit inside the Ornate Layer. I then stamped the sentiments on Pear Pizzazz cardstock and die cut each one the same size layering just the one edge on either the top or bottom of the rectangle I die cut the DSP with. Then I layered them on the Stitched Rectangle DSP so it looked like it was part of the rectangle.

*As I always do with the Stitched Rectangle Dies, I cut the width of my card base to 4-1/8″.

So many pretties to play with in the Ornate Garden Suite!

You can see it HERE.

Thanks for buzzing by, friends…

Product List

Early Espresso Classic Stampin' Pad

Early Espresso Classic Stampin’ Pad
[126974]

Stampin’ Up! Daisy Lane and Daisy Delight

April 10, 2020

I got happy mail this week! I opened up a decorated envelope to see this absolute beauty!

Peg is one of my sweet friends I stamp with on Fridays each month. She is just one of the nicest people you could meet. She really knocked it out of the park with this gorgeous card. I love the white against the Pool Party that was cut with one of the beautiful Delicate Lace Dies. It is a perfect bottom layer to showcase the beautiful medium daisies from the Daisy Lane stamp set punched out with the Medium Daisy Punch. Using Smoky Slate ink to stamp the daisies was a great decision- it is so light and airy. The Smoky Slate ink worked so well with the Clear Faceted Gems. The use of vellum from the Frosted Bouquet  Dies added just the right touch with the Pear Pizzazz leaves from the Poppy Moments Dies. And the sweet sentiment from Well Written stamped on one of the Ornate Frames Dies is just so special to me:)

***********************************************************************

Another smile was put on my face this week when I received another pretty card from my friend, Carla Hess. She used the Daisy Delight and the Daisy Lane stamp sets. The  gray, black, and pink palette with embossed vellum leaves from the Good Morning Magnolia stamp set are such a great combination. I love the layering of the two different daisies. The two daisy stamp sets look so nice together on Carla’s card. She decorated her envelope, too!

Thank you, Carla, for the sweet words of encouragement:)


Thanks for buzzing by, friends…

Have a blessed Easter weekend, dear friends. Praying you are well.
Much love sent to you all.

CindyLeeBee


Product List

Stampin’ Up! Grace’s Garden Bundle Video Tutorial

April 6, 2020

Grace’s Garden…what an awesome Bundle!
That gorgeous trellis and the collection of dies for stamped flowers, fences, a birdie, a kitty…
and more make it a winner!

You are probably thinking…so many die cuts to do…watch my video to see how to stamp and die cut multiples in no time at all!


On one of the insides of the two cards I used the Happy Birthday sentiment from the Sale-a-bration Sending Thoughts stamp set. I stamped the big sentiment inside the trellis.


 I stamped another sentiment on a die from the Stitched So Sweetly Dies for the other card.

Two different cards with different designs- which one do you like the most?
I think I am leaning toward the one on the left with the label.

Thanks for buzzing by, friends…

Measurements:
Card Base: 5-1/2″ x 8-1/2″ scored at 4-1/4″ on the 8-1/2″ side
Balmy Blue panel: 4″ x 5-1/4″
Trellis: you need two of them- 4″ x 5-1/4″
Whisper White for die cut stamped images: 4-1/4″x 5-1/2″, inside panel 4″ x 5-1/4″


Product List