Month: August 2017

August Bonus Project from Craft Project Central

August 28, 2017

Graceful Garden Ensemble –

August Craft Project Central Bonus Project!* 

Created by Regina Andari

Create a pocket full of pretty cards that feature fun Watercolor Pencil techniques.  One of the techniques featured in this tutorial demonstrates how to use one pencil to get the shading and coloring of two or three colors, but your favorite might be the “Cheater’s Reflection” technique.  It is so easy and lends such a nice focal point for any card!  Besides the fun pencil techniques, you’ll also learn how to make your own coordinating dimensional embellishments!  If you decide to make this lovely ensemble to give to someone special, you’ll appreciate that there’s a tutorial for a pretty and simple pocket holder for the four cards.

*Bonus projects can be obtained by subscribing to any of the three, six or 12 month subscription packages, that include the month for which they’d like the bonus. 

SU Beautiful Bouquet with Everyday Jar Framelits

August 26, 2017

I played around with some watercoloring with the Beautiful Bouquet Bundle after seeing so many pretty cards done with this technique- the first one I saw was Sandi MacIver’s creation that inspired me. The bouquet is so gorgeous it can just stand alone on a card but I placed mine in an embossed vellum jar:)

I used my Ruffled Embossing Folder for the backround- so elegant, so vintage…don’t you think?

A bit of gold really dresses up the card, too!

Notice the only stamping on the card is the sentiment! However, there are a TON of flowers and greenery in the set- it is so packed with versatile stamps that mix and match with so many other sets. Take a look on Pinterest under “Stampin’ Up Beautiful Bouquet.” The flowers were die cut from watercolor paper and then moistened with Flirty Flamingo ink using an aquapainter so the Berry Burst ink would run a bit when added last with the aquapainter again. Every one turns out differently so play around and don’t be too picky!

Thanks for buzzing by, friends…


Product List

Craft Project Central # 5

August 22, 2017

Here is a cute Gift project you can try over at Craft Project Central:


Seasons Coasters! Created by  Jari Francis 

Stamped coasters are so simple and inexpensive to make! With the holiday season quickly approaching, it’s time to think about special people in your life you want to create a gift for.  In fact, these stamped coasters would make great gifts for anyone, any time of year!

SU Oh So Eclectic Fun Fold

August 21, 2017

Happy Eclipse Day, peeps!

I created something for the Craft Project Central’s Creating Pretty Cards Challenge # 74.

You can play along and your name will be submitted into a drawing for a free month’s tutorial! 

Here is the sketch you can use for inspiration:


I am not sure what kind of fun fold this is called but it sure is fun to make!

Here is how it folds flat for mailing.

I saw a few of this type of folded card on Pinterest and set out to find measurements, and you get to hear the story….

I knew the card had to fold into 5-1/2″  x 4-1/4″ to fit in an A2 envelope. So, I started with a 4-1/4″ x 11″ piece of Night of Navy card stock and worked backwards. I took 5-1/2″ and added 1″ for it to stand on, added 2-1/4″ for the lower panel (so it would accommodate a 4″ x 2″ piece of striped DSP), added another 1″, and then 1/2″ for the tab to adhere it to the card base. All that added together is 10-1/4.”

So, I cut the card stock to 4-1/4″ x 10-1/4″.

Then, I scored that card base at 5-1/2″, 6-1/2″, 8-3/4″, and 9-3/4″. 

The next step was to fold it at 5-1/2″ and then place a strong adhesive on the 1/2″ tab as seen above.   Fold the cardstock as shown and fold flat being careful not to stick it to anything. Once flat, press on the adhesive. The card should move freely and fold flat. You can then add the 3″ x 4″ upper panel DSP with the flower pattern.

Next, I needed approximately 2-1/2″ x 4 for the white die cut on the other part of the card so I  again worked backwards and cut the other Night of Navy cardstock to 2-3/4″ x 5-3/4. I scored this piece at 4-1/4″ and 5-1/4.”

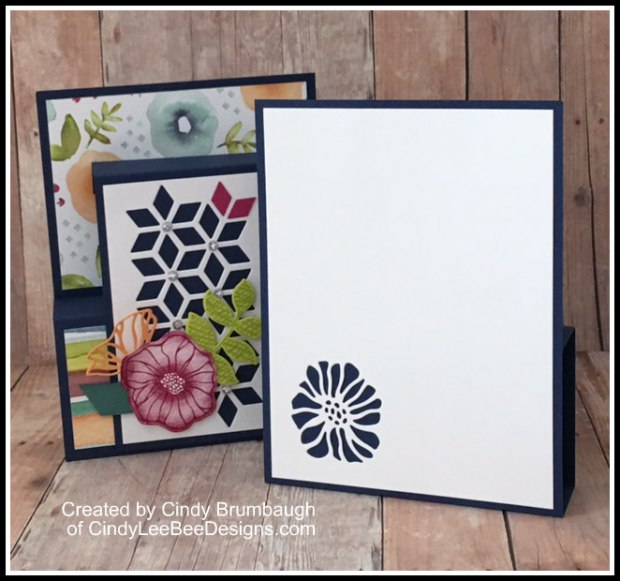
I also had some scraps from another lattice I cut from Berry Burst so I added them to the upper right corner for a little unexpected pop of color:) I decided the card was just the right amount of busy so I left the back open for whatever sentiment I choose in the future. I find myself doing that more often since I end up with a lot of cards but not the specific one I need so leaving it blank allows me to use it later! Do you ever do that?

Product List

Craft Project Central # 4

August 17, 2017

Another fun Craft Project Central project…

Upcycled Gift Boxes!   Created by Christine Miller

You may throw away or recycle cereal, macaroni, or cracker boxes, but you can turn them into beautiful gift boxes for that next special occasion. See how to use Designer Series Paper and other stamping supplies to turn these plain boxes into gift wrap that is almost as impressive as the gift you are giving. You will learn how to wrap two different size boxes in your favorite patterned paper.