I played around with the Stampin’ UP! Around the Bend Dies this past weekend. The cute little sentiment comes from the Stampin’ UP! Beautifully Happy Sale-a-bration Gift with a $100 purchase. See below all the treats!
I love how you can easily layer the wavy dies. I started out with a 2-1/2″ x 5-3/4″ piece of Basic White and Petal Pink to cut the dies. After cutting each one, I lined them up the two pieces and adhered them to each other. Then I trimmed down the layered dies to 5-1/4″. Starting out with both of them being a tad larger than you want, gives you the extra width you need to line them up. That Sweet Sorbet/Petal Pink pattern in the Regency Park Designer paper is just lovely!
Thanks for buzzing by, friends…
Don’t forget…
Press the Sale-a-bration Banner to see everything!!!
I made my first Bay Window Fun Fold! I was happy to showcase the beautiful Stampin’ UP! Fancy Flora Designer Series Paper with the Stampin’ UP! Something Fancy Bundle.
It folds flat… and then tucks into the side label to create a “bay window” effect.
Here is a video showing how I made it:
As seen in the video, place the folded score line against the right edge of inside panel. Then lay the 3/8″ portion down on the inside DSP and put dimensionals along the edge. Then center the sentiment label on the DSP on top of the dimensionals. I didn’t have the gold foil strip on yet in the photo in case you are confused!
It was great to use 6 x 6 DSP for this with just a nice 2″ x 6″ piece leftover:)
Here’s the inside of the each card.
How fun and easy is this fold? I love it! What a great way to showcase DSP with this kind of design. Make sure to cut in line with the design if it has one especially if it is a landscape pattern.
Measurements: Card Base: 4-1/4″ x 11″ scored on 11″ side at 3/8″, 1-7/8″, 3-5/8′, 5-1/8″ and 5-1/2″, DSP 4″ x 5-1/2″ cut from left to right at 1-1/4″x 4″, 1-1/2″ x 4″, 1-1/4″ x 4″, and 1-1/2″ x 4″ as seen in video, (2) 1/4″ x 4″ Gold Foil Strips, Inside panel: 3-1/4″ x 4″, scraps for sentiment labels
Another fun shoebox swap from last week using the Stampin’ UP! Easter Bunny Bundle.
My friend, Jackie Walker, created a great swap. I tweaked it just a tad adding in a black border, some ribbon, and opals on my card. I love to add in another black element when I use black ink.
Thanks for buzzing by, friends…
Don’t forget…
Press the Sale-a-bration Banner to see everything!!!
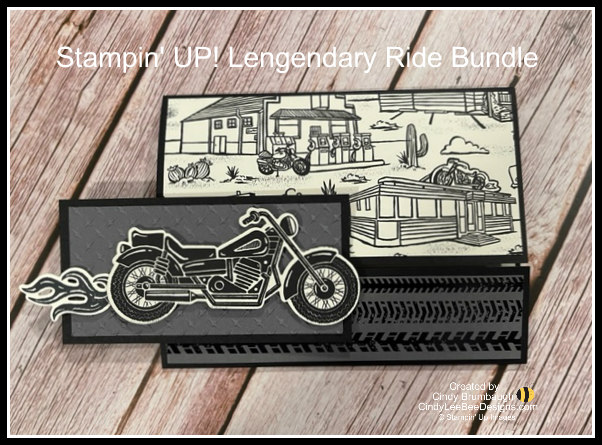
I have another fun card for you today using the Stampin’ UP! Legendary Ride Bundle. It is called a Slide and Lock Fun Fold.
So easy…and perfect to move the motorcycle across the tire treads! Take a look:
Measurements: Card Base: 5-1/2″ x 8-1/2″ scored at 1-1/2 and 5-3/4″ on the 8-1/2″ side, DSP: tires- 1-1/4″ x 5-1/4″ and scene- 2-1/2″ x 5-1/4″, Vanilla inside: 4″ x 5-1/4″, focal panel: embossed part: 2″ x 4″ bordered by 2-1/4″ x 4-1/4″ Basic Black, sliding mechanism: (2) 2″ x 4″ Very Vanilla
Thanks for buzzing by, friends…
Don’t forget…
Press the Sale-a-bration Banner to see everything!!!
Oh, these blooms are gorgeous in the Stampin’ UP! Favored Flowers Designer Series Paper, one of the Sale-a-bration 2023 Gifts.
I did add in some pretty Petal Pink patterned DSP from the Stampin’ UP! Design a Daydream Host Gift in the Annual Catalog. Some Black Matte Dots and some black ribbon from my stash finished off the front of the card.
I love how Stampin’ UP! created this gorgeous DSP as a gift for a $50 order, and it coordinates with the beautiful Stampin’ UP! Fragrant Flowers Bundle.
Here is a video showing how I made a Double Diamond Gatefold card using the Stampin’ UP! True Beauty Bundle:
Make sure to use every scrap along the sides of that DSP! I have a whole baggie full of pieces!


")


 Designer Series Paper")


")
 Designer Series Paper")


 Satin Edged Ribbon")


")

 Designer Series Paper")


 Open Weave Ribbon")


")

 Specialty Designer Series Paper")


")
 Designer Series Paper")

