Stampin’ Up Delicate Lace Edgelits

Stampin’ Up Floral Statements with Delicate Lace Edgelits

April 29, 2019

and a Happy Monday to you, friends!

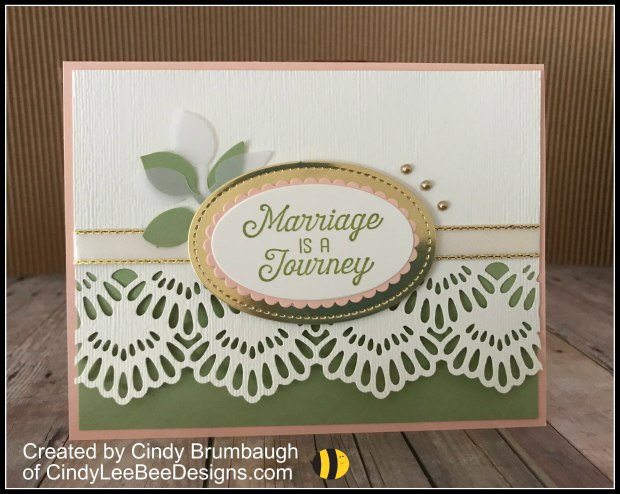
Imagine how quick and easy this card was…after I got the measurements just right, that is!

So, here they are:
Daffodil Card Base 5-1/2″ x 8-1/2″ scored at 4-1/4″ on 8-1/2″ side
Basic Black: 4-1/4″ x 5-1/2″
Whisper White: 2-3/4″ x 5-1/2″

All you have to do is use the Delicate Lace Edgelits to die cut each side of the Basic Black on the 5-1/2″ side. Keep the edge of the die just a tad, maybe 1/8″ or so off the edge of the paper. I experimented and on one card I had a little bit more cut off but the Whisper White still fit in. You want to see that cute little stitching on the inside edge. Oh, and make sure you keep them symmetrical when you die cut them- it does look nicer that way:) Then, you just stamp your floral HELLO and color it pretty! I did use my Stamparatus to get a crisp dark black image, and I let it dry completely before coloring since I stamped it a couple times. I used Daffodil Delight and Old Olive Stampin’ Blends. Now, that we have Stampin’ Blends alcohol markers that do not streak, I am no longer afraid to color! I added a  bee from the Very Vintage Annual Catalog Hostess Set.


Commerical Break:


I will be doing my Annual Catalog Paper and Accessories Shares this year-
keep tuned in for further information in May!

The Floral Statements Stamp Set has another gorgeous image in it that says THANKS with roses surrounding it.


Here are some Stampin’ Up Home Office samples that have some interesting add ons in them:

Thanks for buzzing by, friends…


Product List

Stampin’ Up Delicate Lace Edgelits with Flourishing Phrases

April 26, 2019

Hello, friends! I have another neat card for you using the Delicate Lace Edgelits
with the Flourishing Phrases stamp set.

Lace is just so timeless…I think this pattern is just plain enough to suit most tastes without being to “fru-fru,” don’t you think?

NOTE: I cut my Very Vanilla panel on the front pf the card  to 3-3/4″ x 5-1/4″ and then cut right next to the edge with the die. That way, I had a nice amount of Pear Pizzazz peeking through since it is cut to 4″ x 5-1/4.” I also ran the Very Vanilla panel through the Big Shot with the Subtle Embossing Folder AFTER I die cut it. It gives it such a polished look.

I carried the lace edgelit and ribbon over to the inside. I was pleased how it looked:)

NOTE: I cut the inside Very Vanilla panel to 4″ x 5-1/4″ so I had more room to write a message.

Thanks for buzzing by, friends…


Product List

Leaf Punch

$16.00

Stampin’ Up Delicate Lace Edgelits with Strong and Beautiful

April 24, 2109

Simple and elegant…
I was inspired by a card by Yvonne Pree- thank you, Yvonne!

I made a video showing how quick and easy it is to make this framed card:


Measurements:
Card Base: 5-1/2″ x 8-1/2″ scored at 4-1/4″ on 8-1/2″ side
Lace Edgelits: (4) 2″ x 6″
Sentiment: White 2-1/2″ x 3-1/2″ bordered by Real Red 1-5/8″ x 3″


The Strong and Beautiful Stamp Set has really great sentiments- it’s not just a Mother’s Day stamp set.

Thanks for buzzing by, friends…

Product List