stampin’ up

Stampin’ UP! Party Puffins with 4 x 4 DSP Tip Video Tutorial

November 16, 2022

I have an old paper cutting tip to share with you today! It takes only a 4″ x 4″ piece of DSP to fill the front of your card! The Stampin’ UP! Black & White Designs DSP has some cool patterns that can be flipped and matched up. But you can do this technique with any DSP you want- using one piece of 4″ x 4″ on one card using the front and back or the same pattern or make two cards using different patterns like these cards.

That puffin is just too cute! Check out my video showing how I put these together…

So many fun ways to put the diagonal strip on the middle of the card. Take a look at these cards where I mixed and matched the card bases, diagonals strips and it appears the DSP.

That cute little “bowtie” is a sneak peek of a kite tie from the upcoming Stampin’ UP! Playing in the Rain Dies that I showcased at the Onstage event in Pittsburgh last week. Doesn’t it look so cute on the puffin?

Here is the inside of the cards…I noticed when I was uploading it that one of the candle flames was missing…oops!

Measurements: Card Base: 4-1/4″ x 11″ scored at 5-1/2″ on the 11, DSP: 4″ x 4″ cut as seen in video, Basic White or black panel for mounting DSP and inside: 4″ x 5-1/4″, Diagonal strip: 7/8″ x 6-1/2″, Scraps for ovals and banners

Thanks for buzzing by…

Product List

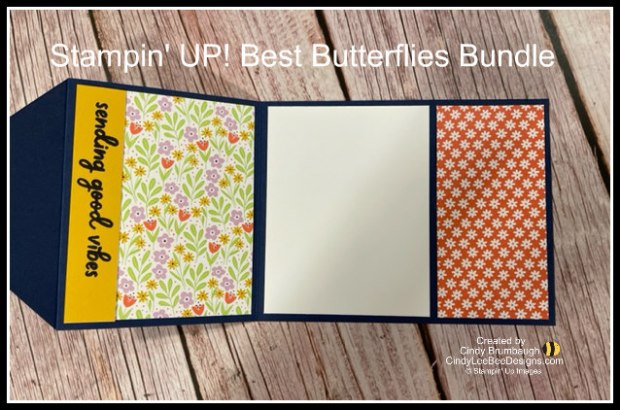
Stampin’ UP! Best Butterflies Bundle Diamond Flip Card

July 4, 2022

Happy Fourth of July everyone!

I have a fun summer card for you using the Diamond Flip Fun Fold Design.

You can see a video at the end of this post to see you to fold the card.

It opens up to show more pretty Stampin’ UP! Butterfly Kisses Designer Series Paper. The Butterly DSP on the front and inside is 2-7/8″ x 4″- the DSP on the inside 3-1/8″ x 4″. The DSP on the right is 2″ x 4″. The Basic White is 3-1/8″ x 4″. On the outside, I stamped the sentiment on a 1/2″ x 4″ piece of cardstock to accommodate the sentiment. When you use a 2-7/8″ DSP and a 3-1/8″ on the inside side or outside (or switch them) you can get one card out of one 6″ x 6″ piece of DSP since you will be using the leftover 2″ x 6″ for the inside right! The larger diamond border on the outside is a 3″ square and the smaller diamond inside it is 2-3/4″.

On the card below, I did the inside a bit different, I stamped a 3/4″ x 4″ strip of cardstock with the another sentiment saying “sending good vibes”. Again, the size accommodates the sentiment.

Measurements: Card Base: 4-1/4″ x 11″ scored at 2-1/8″ and 5-1/2″ on the 11″ side. Cut arrow point as seen in the video tutorial I made using the Brewed for You Bundle.

Thanks for buzzing by, friends…

Product List

Stampin’ Up! Poinsettia Petals Bundle Joy Fold Video Tutorial

September 16, 2020

Yes, poinsettias can be purple…especially when they are made with Stampin’ Up Highland Heather Velveteen Paper and gorgeous Beaded Pearls!

This Joy Fold Fun Fold is so easy to make and fun to decorate, too! The First Frost Designer Series Paper was a perfect match for the Highland Heather Velveteen Paper. Take a look at this video and see how to use the NEW Stampin’ Up! Poinsettia Petals Bundle with the Poinsettia Dies.

I started out making traditional red poinsettias with the Red Velvet Paper in the Mini Catalog. I can’t believe how easy it is to emboss the petals at the same time they are die cut. I made these cards as my hubby was sleeping after his shoulder surgery the last week of August but the purple one came to me as I was prepping for my video on September 1, I could not wait to share it!

Measurements:
Card Base: 8-1/2″ x 4-1/4″ scored at 5-1/2″ on the 8-1/2″ side
Inside back panel: 4″ x 5-1/4″
DSP: 4″ x 2-3/4″
Smaller card on top: 8-1/2″ x 3″ scored at 4-1/4″ on the 8-1/2″
Whisper white panels for stamping: (2) 2-3/4″ x 4″
Velvet/Velveteen Paper: 3-1/2″, 3″, and 2-1/2″ squares for the three flowers

Thanks for buzzing by, friends…

Product List

Stampin’ Up! Peaceful Nativity Bundle

September 14, 2020

I love a Christmas Bundle with Jesus as the main character, can I hear an Amen?
So, the Stampin’ Up! Peaceful Nativity was a must get for me:)

I added some texture by embossing the sky and sand with my Stampin’ Cut and Emboss Machine. The sky is embossed with the Tasteful Textiles EF and the sand is embossed with the Subtle EF. That gave me a great canvas to place my nativity scene on. Just so things stood out, I picked colors that stood out against each other. The stable is Early Espresso, the sand is Crumb Cake, the sky is Seaside Spray, and the palm trees are Old Olive- I just colored the trunks with my Dark Soft Suede Blend. I used Very Vanilla to stamp Mary, Joseph, Jesus, and the donkey.

I used my trusty Stamp-a-ma-jig to place the two sentiments together on the Stitched Oval Die. Did you notice how the hooves on this donkey are lighter? I darkened the ones in the first pic- is there any big difference to you?

 The sentiment on the inside is a simple reminder to keep His light in our hearts all year long:)

Thanks for buzzing by, friends…


Product List

Stampin’ Up! The Right Triangle Bundle with Festive Corners

September 9, 2020

Oops…all my photos are missing THE on the stamp set! It is called THE Right Triangle Bundle!!!
I may have missed THE but I didn’t miss  out on the fun making these cute Christmas cards:)

The Heartwarming Hugs Designer Series Paper is a classic Christmas red and green –
all the patterns are just perfect! And the Festive Corners stamp set is so cool!

P.S. I do know the difference between a right, isosceles, and equilateral triangle but got all mixed up on camera…lol!
I even know how to inscribe a circle in a triangle…hahaha

I also made one with the Moose Punch that is back in this Mini Catalog!
I used the Banner Year Stamp Set for the ‘be merry” sentiment.

I have to say I had a ball playing with all the triangles…and there are still two other kinds of triangles in the Stitched Triangles Die Set to play with!

Measurements:
Card Base: 4-1/4″ x 11″ scored at 5-1/2″ on the 11″ side, Trim 1/8″ off the 4-1/4″ side to make it 4-1/8″ wide
DSP: 4″ x 5-1/4″ die cut with the Largest Stitched Rectangle with the third largest inside it.
Whisper White inside: 4″ x 5-1/4″ and 4″ x 5″ to cut out white stitched rectangle with third largest triangle for front

Don’t forget September 10 is the last day to sign up for the September 2020 Paper Pumpkin called “Hello, Pumpkin”

Box of Sunshine - June Paper Pumpkin

Paper Pumpkin is a Stampin’ Up! monthly subscription service that offers fun ‘n’ easy papercrafting projects for crafters of any skill level! In these themed all-inclusive kits, subscribers receive pre-cut paper pieces, embellishments, ink, and an exclusive stamp set. As the subscription continues, subscribers will have a collection of cards and other creations for a variety of occasions, in addition to a stockpile of supplies!

September’s kit is a must-have for those who love to celebrate all things spooky. But, for those who don’t enjoy the Halloween haunts, the multi-occasion stamp set combined with a variety of die-cut and reversible paper pieces offers many ways to customize your fall crafts celebrating Thanksgiving and the autumn season. Make them all the same, or mix ‘n’ match!

ABOUT THE SEPTEMBER KIT:

 Hello, Pumpkin

The kit contains enough supplies to create 20 cracker box treat packages that can be customized to celebrate Halloween, Thanksgiving, and autumn.
Coordinating Colors: Bumblebee, Basic Black, Cajun Craze, Cinnamon Cider, Mossy Meadow, Old Olive, Pumpkin Pie, white

Subscribe with me HERE.

*My Active Paper Pumpkin Subscribers (who receive their monthly kit through me) will be mailed, by the end of the month, an alternate card/project.

Product List