Notecard

Stampin’ Up Bunch of Blossoms Punch Bundle Video Tutorial

May 1, 2019

I have had this for a long time and just inked it up…it is an AWESOME bundle to use!
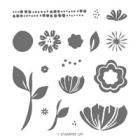
The Stampin’ Up Bunch of Blossoms Stamp Set with the Blossom Builder Punch
makes gorgeous dimensional flowers!

The little splatters were an image in the Magical Mermaid Stamp Set. The white panel is 2-3/4″ x 4″ and the Pear Pizzazz border is  3″ x 4-1/4″.

I made a video to show you a few tips:

It is actually a three-step stamp set meaning that you can create a blossom with depth of two colors and then add an outline around it. I just did the two colors on each petal. I only stamped the stem and leaves one time.

Here is a peek at the stamp set:

It has great sentiments, don’t you think?
Well, this pretty baby is retiring so if you want it…get it soon!

Thanks for buzzing by, friends…


I will be doing my Annual Catalog Paper and Accessories Shares this year-
keep tuned in for further information this month of May!

Product List

THe white splatered panel is 2-3/4″ x 4″ bordered by a Pear Piz 3″ x 4-1/4″.

Stampin’ Up Floral Statements with Delicate Lace Edgelits

April 29, 2019

and a Happy Monday to you, friends!

Imagine how quick and easy this card was…after I got the measurements just right, that is!

So, here they are:
Daffodil Card Base 5-1/2″ x 8-1/2″ scored at 4-1/4″ on 8-1/2″ side
Basic Black: 4-1/4″ x 5-1/2″
Whisper White: 2-3/4″ x 5-1/2″

All you have to do is use the Delicate Lace Edgelits to die cut each side of the Basic Black on the 5-1/2″ side. Keep the edge of the die just a tad, maybe 1/8″ or so off the edge of the paper. I experimented and on one card I had a little bit more cut off but the Whisper White still fit in. You want to see that cute little stitching on the inside edge. Oh, and make sure you keep them symmetrical when you die cut them- it does look nicer that way:) Then, you just stamp your floral HELLO and color it pretty! I did use my Stamparatus to get a crisp dark black image, and I let it dry completely before coloring since I stamped it a couple times. I used Daffodil Delight and Old Olive Stampin’ Blends. Now, that we have Stampin’ Blends alcohol markers that do not streak, I am no longer afraid to color! I added a  bee from the Very Vintage Annual Catalog Hostess Set.


Commerical Break:


I will be doing my Annual Catalog Paper and Accessories Shares this year-
keep tuned in for further information in May!

The Floral Statements Stamp Set has another gorgeous image in it that says THANKS with roses surrounding it.


Here are some Stampin’ Up Home Office samples that have some interesting add ons in them:

Thanks for buzzing by, friends…


Product List

Stampin’ Up Bloom by Bloom Triple Panel Stand Up Card Video Tutorial

March 13, 2019

Stampin’ Up’s Bloom by Bloom…BIG and BOLD says it all!

I wanted to show off the BOLD images along with the
BIG splash of colors in the  Happiness Blooms Designer Series Paper
so I made a Triple Panel Stand Up card.

Here is a video showing you how to make one:

I love the sentiment in the All Adorned Stamp Set available as a free gift with a Sale-a-bration purchase until March 31, 2019.

There are even three little punches called BITTY BLOOMS that come bundled with the Stampin’ Up Bloom by Bloom stamp set.
Three of them cut out images in the Designer Series Paper. See the second one from the right?
The oval makes little petals that go around the circle which becomes the middle of the flower so you can make your own little cardstock posies!


Thanks for buzzing by, friends…

Measurements:
Call Me Clover Card Base: 5-1/2” x 8-1/2” scored at 1-1/2”, 2-3/4”, 5-3/4” and 7” on the 8-1/2″ side
Whisper White Front Panel and Back Panel: : (2) of 2-3/4” x 5-1/4” and scrap for label
Happiness Blooms DSP: (2) 1-1/4″ x 5-1/4″


Product List


Stampin’ Up Vertical Greetings- So Simple!

March 8, 2019

Happy Friday, friends! Hoping you all have a great weekend ahead…

I have had the Stampin’ Up Vertical Greetings forever…
and just inked it up! Maybe I was waiting for the Stamparatus?
Let me tell you,  it made stamping the topiaries in a straight line so easy with the Hinge Stamping Technique!

I just lined up the topiary on the horizontal and hinge stamped three of them and then flipped my card upright.
Actually, I could have done it vertically (as the stamp name says, lol)  and just pulled the acrylic plate from the top, too!
I also had the sentiment lined up on another plate so it was straight when it stamped on the panel:)

You can choose from three different potted plants and 6 versatile sentiments in the set…so fun!

Copy of Copy of Copy of Copy of Copy of CindyLeeBeeDesigns.com


Thanks for buzzing by, friends…

Product List

Stamparatus

$49.00

Stampin’ Up Birthday Cheer Video Tutorial

February 27, 2019

Hello, Happy over the Hump Day!
Today I have two super easy, super cute birthday cards for you.

I made a video to give you some tips:)

A Simple card with a Big and Bold die cut and sentiment gives the card a WOW factor!

Using your Stamparatus lets you crank out a bunch of these babies in no time!
And the Big Shot die cutting is so simple, too.

Measurements:
Whisper White Card Base: Cupcakes 4-1/4″ x 11″ scored at 5-1/2″,
Presents 5-1/2″ x 8-1/2″ scored at 4-1/4″
Coastal Cabana and Melon Mambo panels: 4″ x 5-1/4″
Basic Black  Cardstock for die cuts: Presents 2-1/2″ x 5-1/4″, Cupcakes 2-1/8″ x 4″
Black/Silver Ribbon: 5-1/2″ and 6-1/2″

Thanks for buzzing by, friends…

Product List

Stamparatus

$49.00