SU Fun fold Card

Stampin’ Up Ready for Christmas

December 9, 2018


So, this past week, one of my friends, Angela, asked me where to find a card on my blog.
She wanted to refer a friend to a card that we made using the SU Ready for Christmas Bundle.
I got onto my computer, and indeed I did not post it! However, the funniest thing is…I actually had added it to the line up of displays this month
at class just to remind everyone at class that it is still in the Annual Catalog. So, Angela was able to see it and share it.

I perused Pinterest to find who I cased it from…because it was so darn neat!
I found it was Joanne Cantrell:

This is the one we created for a Product Class using the SU Ready for Christmas last year.
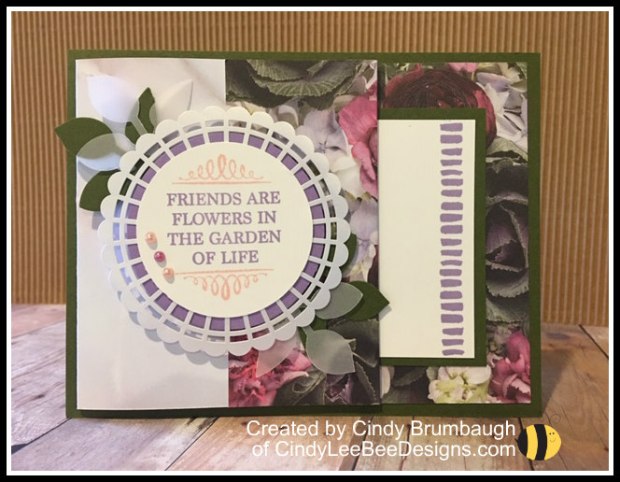
You can use any small patterned DSP to be the wallpaper!

A simple folding back of half of the card front at 2-3/4″ makes this fun fold.

A message can be written on the middle panel that is left unstamped. I should have put a little sentiment there:)

I forgot how cool this bundle is…those puppies and presents…what a great set that is in the Annual Catalog!


Thanks for buzzing by, friends…


Product List

Garden Green Stampin' Write Marker

Garden Green Stampin’ Write Marker
[100080]
$3.50

Gold Glimmer Paper

Gold Glimmer Paper
[133719]
$5.00

Stampin’ Up A Big Thank You Foldover DSP Video Tutorial

November 28, 2018

Don’t forget that the Online Extravaganza is up and running!

A lot of Goodies on the list!!! Check out the last day of the sale  HERE


Now for some eye candy….

I had fun making this cute Foldover Designer Series Paper card.

A little history on the designing of this…I was playing around with folding my cardstock back on the front as I have done before for something different and adding a strip of DSP to the inside but then thought I wanted to showcase this absolutely gorgeous DSP more.

You know how it is with DSP, you either hoard it and use little strips here and there or just go all out and use a *ouch* huge piece!  So, I decided cut my 12″ x 12″ piece into (3) 4″ by 10-1/2″ pieces and do a fun fold of DSP on the front. But needed to give it some support so I mounted it on a 1/4 sheet of cardstock and made a place for the inside greeting! See how much of the DSP you can show off? It is a great use of the DSP- three cards from sheet!

Tip: cut the 1-1/2″ piece off first from the 12″ x 12″ to make it 10-1/2″.
That way, you have a 1-1/2″ x 12″ piece to use later on either a landscape of a portrait card:)

How about a video to show you how I did it?


The Petal Promenade DSP is just perfect for this fun fold! Here is one with Highland Heather and Petal Pink with the darker floral.

The Share What You Love Artisan Pearls work lovely with the colors in DSP pack, too!


Time to play with that DSP you have…if you make one…send me a pic or email…I love happy mail!

Thanks for buzzing by, friends…

Measurements:

Cardstock Base: 4-1/4″ x 5-1/2″
DSP: 10-1/2″ x 4″, scored at 5-1/4 and 8-3/4″
Cardstock inside: 3″ x 4-1/4″ Whisper White inside: 2-3/4″ x 4″

Product List

Leaf Punch

$16.00

SU Broadway Birthday Fun Fold Video

June 25, 2018

Happy Monday to you! I have a fun fold birthday card for you today! And, it has a video, too!

I used to awesome new Broadway Birthday Bundle and the Broadway Bound Specialty Designer Series Paper. It is the greatest paper- bold colors on one side and gold patterns on the other!

Here’s the video:

 * TIP: When I cut for the card, I cut two cards at a time from a whole sheet of Basic Black cardstock so I had a 2-1/2″ x 8-1/2″ piece of Basic Black cardstock lying on my desk. After the video was made, I saw the 2-1/2″ x 8-1/2″ piece I cut off  the front of my card on my desk. I thought…hmmmm…that 2-1/2″ x 8-1/2″ I cut off the the Basic Black could be the actual flap! In the video, I have the flap measuring 2-3/4″ x 8-1/2″ scored at 4-1/4″ but in the photo below you see the slight difference in the flaps, I just altered the other flap to be 2-1/2″ x 8-1/2″ and the Lovely Lipstick panel on the flap is 2-1/4″ x 4″. Just thought I would share that- no waste!

Measurements:
Basic Black Cardstock Base: 4-1/4″ x 11″ scored at 5-1/2″ with 2-1/2″ cut off from the front right side of  the card.  Front Flap: 2-3/4″ (or 2-1/2″) x 8-1/2″scored at 4-1/4″ See note above
Lovely Lipstick: 2-1/2″ or (2-1/4″) x 4″ See note above,  For WISH 2-3/4″ x 4″
Whisper White: 2-3/4″ x 4″ for Hooray, 2-1/2″ x 4″ for second sign inside
Lemon Lime Twist: 2-1/2″ x 4″ for second sign
Gray Granite: 3/8″ x 3″
DSP: One 2-1/2″ x 4 for inside of back of card and
two 2-3/4″ x 4″ pieces for the front and back of the front flap
Silver Glimmer: 2-1/2″ x 2-1/2″
Basic Black Baker’s Twine: 4″

Product List

SU Love What You Do Center Step Card

June 8, 2018

I made another Center Step Card using the SU Love What You Do stamp set
with the lovely Share What You Love Designer Series Paper.
You can see my Center Step Card video tutorial HERE.

I used a sentiment from the Beautiful You stamp set and die cut it with the Layering Ovals.

Aren’t those Share What You Love Artisan Pearls just so perfect! I love the colors they come in…make sure you take a look at them in the catalog…so pretty:)

If you have a birthday this week, consider this is for you, Gorgeous!

Thanks for buzzing by, friends…

Product List

SU Love What You Do Double Triangle Fun Fold Video Tutorial

April 30, 2018

Tomorrow is the Early Release of the SHARE WHAT YOU LOVE Bundles!
Be sure to check back!

Here is a sneak peek of the
SU Love What You Do stamp set,
the Share What You Love Specialty Designer Series Paper, and
and the Share What You Love Embellishment Kit.

Here is a video tutorial I made of the Double Triangle Fun Fold:
*The DSP is 3-3/4″ x 5″ before you cut it into two triangles:)


Here is a view of the inside of the card showing how to attach the doily to the front:

Measurements for the Double Triangle Fun Fold:
Tranquil Tide Cardstock Base: 8-1/2″ x 11″ scored in half both vertically and horizontally and then cut in half on the diagonal
(will make two cards when cut)
Share What You Love Specialty Designer Series Paper: 3-3/4″ x 5″ cut in half diagonally
Tranquil Tide Cardstock: 2″ and 2-1/4″ circles
Mint Macaron Cardstock: 2″ circle
Mint Macaron 5/8″ Mini Striped Ribbon about 4″cut on angle on each side (on Clearance Rack)
Basic Black Cardstock: 1/2″ x 4″ strip cut on angle on each side
Tranquil Tide Baker’s Twine: about 8″ and Metallic flower (1) both found in the Share What You Love Embellishmant Kit
Pearlized Doilies (1)

Product List

Mint Macaron 8-1/2" X 11" Cardstock

Mint Macaron 8-1/2″ X 11″ Cardstock
[138337]
$8.00

Mint Macaron Classic Stampin' Pad

Mint Macaron Classic Stampin’ Pad
[138326]
$6.50

Mint Macaron 5/8" (1.6 Cm) Mini Striped Ribbon

Mint Macaron 5/8″ (1.6 Cm) Mini Striped Ribbon
[141431]
$8.00

Thanks for buzzing by, friends…