SU Garden in Bloom

SU Garden in Bloom Calendars with Merry Medley Packaging

December 8, 2016

Looking for a sweet little gift to give to those who touch your life? How about a calendar they look at frequently and know that you care for them! I made these calendars for my wonderful group of stamping friends. I picked a sentiment from SU Garden in Bloom that I wanted them to read a lot.

“Hope you’re feeling special today…because that’s just what you are!”

Of course, the little BEE is ME reminding them each day!

I am blown away by how blessed I am to have met so many delightful women through my classes…such dear gals I truly cherish! I look so forward to seeing them each month and keeping in touch in between- love you all bunches!!!

su-garden-in-bloom-5

su-garden-in-bloom-all-calendars

The flowers are from the SU Botanical Builder Framelits- my daughter helped me die cut them! Thank you, Sarah:)

calendar-side-view

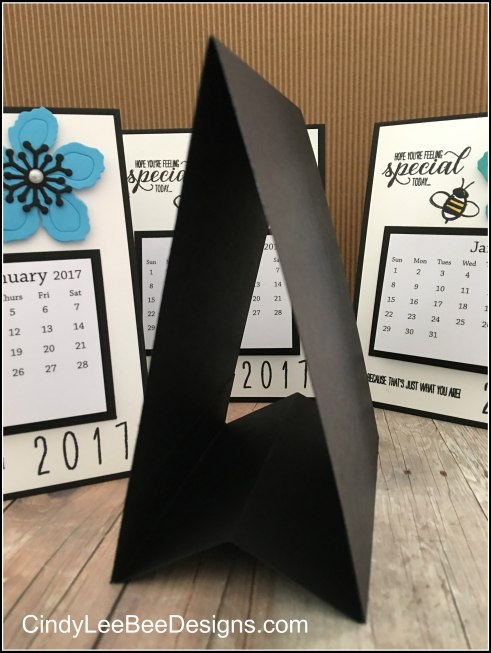
These calendars are a standard A2 size (4 1/4″ x 5 1/2″) with a stand up mechanism adhered inside on the bottom the card. See the photo below for dimensions. I found it easiest to put adhesive on the inside bottoms of the card base and then adhere the easel mechanism one side at a time lining it up against the edge. I love how they stand up so nicely with the easel.

calendar-easel-mechanism

I even had a friend email me a pic of her calendar sitting by her computer:)

carols-calendar

Product List

Daffodil Delight Stampin' Write Marker

Daffodil Delight Stampin’ Write Marker
[119677]

I packaged the calendar gifts in SU Kraft Tag a Bag Gift Bags stamped with the amazing SU Merry Medley Background stamp, SU Layering Ovals, and some retired  Old Olive and Cherry Cobbler DSP punched with the retired SU Tree Punch. These bags are perfect for an A2 card- I even folded back the top 1″ of the pinked bag top so it is even a bit bigger to accommodate other treats!

su-merry-medley-gift-bags

Product List

SU Wild About Flowers

July 20, 2015

pp254

“FRAME” is the buzzword at The Paper Players #254 this week so I decided to show you a technique I learned from my upline Linda Heller last month at our demo meeting. It involves the simple act of Watercoloring on cardstock after using the SU  Brick Wall embossing folder.  Linda showed us how to use our aquapainters to watercolor the bricks with Cajun Craze ink- oh, it is sooooo cool!

SU Wild about Flowers Bick Wall insp by Lina

She made an awesome card with the new Lots of Labels framelits and an amazing color combo of Mossy Meadow, Tip Top Taupe, Soft Sky, and Cajun Craze ink. I have seen more than a few creative cards on Pinterest using the Brick Wall embossed panel with these framelits used to create an opening- they are wonderful used together!

Linda used a stamp set I did not have so I pulled out another one…
*proof to my family that I do not have EVERYTHING Stampin’ Up has in the catalog…LOL.

 I picked the SU Wild About Flowers stamp set to stamp a CAS image. I initially added the Mossy Meadow FRAME around the opening of the Brick Wall to set off the opening but then noticed how the frame really showcased not only the opening but also the beautiful Soft Sky cardstock,  the watercolored brick panel, and the flower image all at the same time:)

 All you do to create a frame is put one framelit inside the other one when running it through the Big Shot.  The Magnetic Platform comes in handy but if you do not have one- just make sure to secure the framelits as they go through the machine.

I  tucked a sentiment from the SU Garden in Bloom stamp set inside the frame on the front of the card and  finished off the inside with another sentiment in the stamp set.

SU Wild About Flowers Brick Wall inside

SU Wild About Flowers Bick Wall Close up

See how neat the watercolor is…as you are “painting” it doesn’t look that great, and then it dries and the oohs and aahs start! I like it because you don’t have to be perfect on it, every card my girls did at class looked different and every card was awesome!

Thanks for buzzing by…cindy-bee-only.jpg

SU Garden in Bloom with Tin of Cards

July 11, 2015

Flowers and bees- one my parents love and one they fear.

My mom and dad actually  transport their flowers each year from their snowbird home in Florida up to Pittsburgh each summer. They seriously have the same flowers growing all year long in two different states! But one thing they steer way clear of is BEES! My dad is extremely allergic and has almost died twice from stings. The only bee he can come near is me!cindy-bee-only.jpgWe made this cute little 4″ x 4″ card at our Demo Meeting
with my upline Linda Heller a couple of weeks ago:

SU In the Garden Linda's  4x4 card

I fell in LOVE with the simplicity of Linda’s design but wanted to make it into an A2 size card so… if you remember my heart edged card a few posts ago…I used the same concept and stepped it up with a black border on the front and some DSP on the side. I just cut off 1 1/4″ off of the right edge of the front of the 5 1/2″ x 4 1/4″ landscape card.

SU Garden in Bloom flat

SU In the Garden Black Bordered Front

The stamped front panel is a 3 3/4″ square bordered by a 4″ black square. The (retired) DSP measures 1 3/4″ x 3 3/4″ bordered by a 2″ x 4″ rectangle.

SU In the Garden Linda CASE Open

SU In the Garden Front View Linda CASE

Before you stamp the lower doodle line, you mask a space where the sentiment will be stamped. Just cut a piece of washi tape the size of your sentiment, place it on the lower part of your front panel, and stamp over it with the doodle line.

On this particular card panel that is a 3 3/4″ square, you will stamp a perfectly centered  square if you line up the doodle line on your SU Grid Paper. Line up the bottom edge of your panel anywhere on a grid line so that it lines up on the bottom and both sides vertically as well. Just stamp the doodle line one 1/4″ square up from the  bottom edge and  leave one 1/4″ square blank on both sides.  It is like you are letting the doodle line fill in the imaginary line  from one side to the other side 1/4″ up from the bottom.

See this photo:

Doodle

Turn the card and finish all four sides to form the square. Be careful when you remove the mask later because the ink will be wet. After you remove the washi mask,  you add the sentiment (like HELLO)  in the space left by the mask – easy peasy! The doodles and the sentiment come from the SU Tin of Cards stamp set. I added by bee trail by hand using myBasic Black SU Write Markers .

This card pleaded with me NOT to embellish it so all I did was add some Crystal Effects to the bee and the middle of the flower to add a little sumthin’ sumthin’.

SU In the Garden Crystal Effects Bee

SU In the Garden  Linda CASE Inside

 I  put the sentiment on the inside with a little butterfly so a message could be written on the side with the DSP.

Take a look-see at the SU Garden in Bloom stamp set- so many neat two-step stamping can be done with this photopolymer stamp set!

139433G

Thanks for buzzing by…cindy-bee-only.jpg