Month: September 2015

Weekly Deals for Sept. 29 to Oct. 5

September 29, 2015

Oh, some more fun stuff on the Weekly Deals- TWO Punch boards, a border punch, TWO framelits,  and an embossing folder tied up with some Baker’s Twine!

Remember these two cuties using the Happy Heart Embossing Folder?

SU Mini Treat Bag Groovy Kind of Love!

SU Lovely Amazing You Front View

Check out these Pinterest sites to see some great ideas for the Envelope Punch Board.

and the Gift Box Punch Board.

Crushed Curry Baker's Twine by Stampin' Up!
CRUSHED CURRY BAKER’S TWINE
Price: $3.00
NOW $2.25
Envelope Punch Board by Stampin' Up!
ENVELOPE PUNCH BOARD
Price: $20.00
NOW $15.00
Floral Frames Collection Framelits Dies by Stampin' Up!
FLORAL FRAMES COLLECTION FRAMELITS DIES
Price: $27.00
NOW $20.25
Gift Box Punch Board by Stampin' Up!
GIFT BOX PUNCH BOARD
Price: $20.00
NOW $15.00
Handpicked Framelits Dies by Stampin' Up!
HANDPICKED FRAMELITS DIES
Price: $25.00
NOW $18.75
Happy Heart Textured Impressions Embossing Folder by Stampin' Up!
HAPPY HEART TEXTURED IMPRESSIONS EMBOSSING FOLDER
Price: $7.50
NOW $5.63
Hearts Border Punch by Stampin' Up!
HEARTS BORDER PUNCH
Price: $16.00
NOW $12.00

Here are two Stampin’ UP videos demonstrating

the Envelope and the Gift Box Punch Boards:

Have questions or want to order?

You can visit my ONLINE STORE on the right sidebar

or contact me at cindyleebee@gmail.com or 724-323-2296

SU Sleigh Ride Edgelits with SU Greetings Thinlits

September 24, 2015

Here is a card we made at our last Product Class. Each attendee took home the Jingle All the Way Bundle with the Sleigh Ride Edgelits after making three cards. We had a great time with fun ladies in both classes- thanks so much for coming, friends:)

SU Sleigh Ride Edgelits Greens

To make this card, just choose a circle that fits around the die cuts of the trees and houses. When you die cut with the edgelits, make your paper wider (about 1/2″ on each side) than the size of the circle. I left 1/2″ uncut on the sides where the houses and trees were located then I just used my paper snips to cut into the paper to meet where the die stopped cutting. On the example below with the TREES, the 1/2″ is on the right side but the extra 1/2″ will be on the left side when using the HOUSES. Creating this “extra” space allows you room to work with when the circle is placed over the three die cuts. On my first attempt without the extra space, I found it a bit tricky to fit the trees within the circle- so on my next try, I moved the die over 1/2″ and it worked great.

IMG_3574

I die cut the So Saffron circle by itself and set it aside since my Big Shot did not cut through 4 layers cleanly. Then I die cut the three edgelits (one of the houses and two colors of trees). I placed the die cuts of the houses and trees on top of each other staggering them while checking to make sure they  would all fit in the circle that I had chosen. Just keep placing the circle die over them to see that they fit. After I was happy with the placement of the die cuts, I put the circle die over all three and ran them through the Big Shot back and forth. I then adhered them perfectly onto the So Saffron Circle I had set aside. I popped the circle off  the Hardwood background with dimensionals and doubled up on my “thanks” sentiment because I  wanted some more dimension on this card. Aren’t those little wooden elements the cutest things?

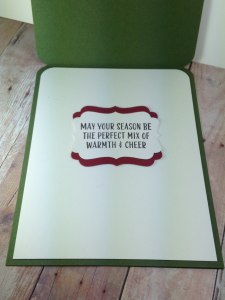
Here’s a cute way to do the inside- just cut away some of the bottom of the Very Vanilla panel allowing the Mossy Meadow to peek through:

SU Sleigh Ride inside

Card Recipe:
STAMPS: SU Hardwood background
INK: Soft Suede
PAPER: Soft Suede, Mossy Meadow, Old Olive, and So Saffron, Very Vanilla
ACCESSORIES: SU Into the Wood Elements, SU Sleigh Ride Edgelits, SU Greetings Thinlits

I was inspired by this card by the talented Amy Koenders:

amys card

Thanks for buzzing by, friends…cindy-bee-only.jpg

Weekly Deals are up!

September 22, 2015

Remember this card? I used the SU Remarkable You stamp set. It is a lovely, large stamp set with three beautiful lilies in it but it is one of the pricier stamp sets in the catalog…and now until Monday, September 28 it is on the Weekly Deals at a 25% discount!!!

SU Remarkable You Calla Lily Yellow button

Check out the rest of the deals- some great products…

Brights Sequin Assortment by Stampin' Up!
BRIGHTS SEQUIN ASSORTMENT
Price: $5.00
NOW $3.75
Gold 1/8 Ribbon by Stampin' Up!
GOLD 1/8″ RIBBON
Price: $5.00
NOW $3.75
Gold Stampin' Glitter by Stampin' Up!
GOLD STAMPIN’ GLITTER
Price: $4.00
NOW $3.00
Lucky Stars Textured Impressions Embossing Folders by Stampin' Up!
LUCKY STARS TEXTURED IMPRESSIONS EMBOSSING FOLDERS
Price: $7.50
NOW $5.63
Ornate Tag Topper Punch by Stampin' Up!
ORNATE TAG TOPPER PUNCH
Price: $23.00
NOW $17.25
Remarkable You Clear-Mount Stamp Set by Stampin' Up!
REMARKABLE YOU CLEAR-MOUNT STAMP SET
Price: $33.00
NOW $24.75
Stars Framelits Dies by Stampin' Up!
STARS FRAMELITS DIES
Price: $27.00
NOW $20.25

If you need anything or have any questions,
please contact me at cindyleebee@gmail.com
or call me at 724-323-2296
or shop online HERE.

SU Sheltering Tree Fall Easel Card

September 21, 2015

Good Monday to you all!

I saw that Laurie’s challenge over at The Paper Players #263 calls for a FALL card.

pp263

Well, I just happened to have one up my sleeve since I used the SU Sheltering Tree to create an easel card to show one of my friends how to make one!

SU Sheltering Tree Fall Easel Bordered

Here it is closed:
SU Sheltering Tree Easel Front closed

To achieve the colorful leaves, I inked up my tree foliage with Daffodil Delight ink and then added Pumpkin Pie and Old Olive ink with finger sponge daubers in different places. I also did that with the little “flowers” that are included in the set so that I had some fallen leaves on the ground.

SU Sheltering Tree showing easel

For this easel card, I took a 4 1/4″ x 11″ piece of Chocolate Chip cardstock and scored it at 2 3/4″ and 5 1/2.  I then folded it at 5 1/2″ like I would for a standard card. Then I just folded up the 2 3/4″ part to create the easel. I cut another 4 1/4″ x 5 1/2″ Chocolate Chip panel that I adhered to the 2 3/4″ part of the easel after I had stamped the tree on a 3 3/4″ x 5″ Very Vanilla panel bordered by a 4″ x 5 1/4″ Pumpkin Pie panel. *TIP- when adhering the stamped tree panel, put your adhesive on the 2 3/4″ part of the easel not the panel so you won’t have any adhesive showing.

After stamping my bottom (inside) panel with the same measurements as the other panel, I placed my button with a sturdy glue dot so that the easel could sit up against it. You can place your easel mechanism anywhere you want, on this particular card, I left ample space for writing.

SU Sheltering Tree bottom part

I have not decided yet what kind of card this will be or where I will put the sentiment so I left it blank for now. I do that often, how about you?

SU Sheltering Tree Fall sentiments

 Hope your week starts off wonderfully friends,

Thanks for buzzing by…

cindy-bee-only.jpg

SU Joyful Season with Expressions Natural Elements

September 16, 2015

I just love the Expressions Natural Elements in the Annual Catalog. Have you noticed the card on page 28 of the Holiday catalog card using the SU Joyful Season stamp set with Celebrate on it? I was inspired to create my own card using SU Joyful Season and the wooden element.

Here is what I came up with using the sketch challenge at Can You Case It #86:

CYCI86-232x300

SU Joyful Season with Wooden Celebrate

I used a retired SU ribbon glide and some Cherry Cobbler Dazzling Details to jazz up the CAS design of the card. I used Mossy Meadow, Cherry Cobbler, and Very Vanilla as my color palette.

SU Joyful Season inside

Thanks for buzzing by…
cindy-bee-only.jpg