And, of course, it opens to reveal the bistro table and chairs…
It looks like it took a long time to make but actually, it did not.
Maybe because I am still so happy we have the Stampin’ Blends to color so beautifully without any streaks!
I used 1″ x 4-1/4″ strips of the Fresh Florals Powder Pink DSP on the sides of the card. I added a 1/4″ strip of Whisper White to the inside sides of the DSP to frame the opening.
Check out this video made by Brandi at the SU Home Office…
Hello, friends!
I have another fun fold video for you today using the
Hold on to Hope Bundle found in the Occasions Catalog.
Here is how you create a Bridge Fold Card:
Notice the framelit that cut out the fancy cross below is an additional one that does not coordinate with any image-
how nice to have that, huh? I inlaid the cross in the cut out I made with another die after stamping the foliage.
Here is a simple way to finish off the back to write a message of encouragement or sympathy.
The Hold on to Hope Stamp Set is a versatile one that offers a variety of uses
because of these two sentiments-
You can use this stamp set for many occasions like
a Birthday, a Graduation, a Christening, a Baptism, a Confirmation,
a Holy Communion, or even a Bridal Shower!
Measurements:
Tranquil Tide Card Base- 4-1/4″ x 8″, scored at 1-1/4″, 2-1/2″, 5-1/2″, and 6-3/4″
Tranquil Tide Bridge- 1″ x 5-1/2″, Whisper White 3/4″ x 5-1/4″
Fresh Florals DSP- 1″ x 4″ (x2)
Stitched Shapes Oval- 3″ x 3-1/2″, Tranquil Tide Oval Scallop 3-1/4″ x 3-1/2″
Middle Whisper White Panel & Back of Card- 2-3/4″ x 4″
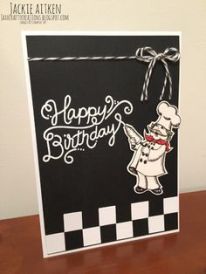
I saw this card on Pinterest created by Jackie Aiken and thought it was super cute!
So, I essentially cased it with some tweaks…
I added a red border around the black panel to pull out the red on his scarf. To make the checkered table cloth, I cut five 3/4″ white squares and adhered them to the bottom of the Basic Black panel which is 3-3/4″ x 5″.
I also brought a cake to the party!
I was tempted to color his face and hair but really liked the red, black and white palette
without any other color added.
This bundle may be a bit pricey at $62 but it has a ton of stamps/framelits in itand it comes with apack of Designer Series Paper called Birthday Memories that is so festive! I just love the nostalgic look of the stamp set and how easy it is to die cut the stamped images and the images on the Designer Series Paper, too.
And now that we have the Stampin’ Blends, it’s so easy to color them!
Take a look at this Bundle:
And here is the gorgeous Birthday Memories DSP!
And if you purchase the Birthday Delivery Bundle during Sale-a-Bration, you get to pick a FREE item from the Sale-a-Bration Brochure and earn 4 Bee-Wards from me!
Let me know if you are interested:)
You can contact me at cindyleebee@gmail.com or 724-323-2296. You can shop at my ONLINE STORE as well 24/7.
It will be Valentine’s Day before you know- one of the biggest card giving days! My mom is going to love this card…although she loves roosters the SU This Little Piggy stamp set is just too cute not to use with the SU Barn Door stamp set! Maybe I will use the rooster from SU Wood Words on her Barn Door birthday card…
I love the sliding mechanism made with the Sliding Door Framelits-
so easy to do! You put one message on the left side…
and slide it over to reveal another message on the right side.
I rounded the corners on the 2-1/2″ x 4″ Whisper White cardstock where I stamped the piggy.
I used Pool Party ink on the bow on the wreath because it was a bit darker than Soft Sky ink.
Howdy Partner! I gotcha a fun fold card today .
If you rustle up some Basic Black, Real Red, and Crumb Cake Cardstock, some Basic Black ink and yer Stitched Shapes and Layered Oval Framelits…you got the makins for this here card…
Yeah, you gonna be needin, the SU Country Livin’, Paisleys and Posies, and Hardwood stamp sets, too.
It all fits nice and tidy in an A2 envelope to boot…
I hope you can set yerself down for a spell to see how this puppy was done…
Please note: SENTIMENT BANNER IS 1/2″ X 3″ NOT 1″ X 3″
Measurements:
Card Base- Basic Black 4-1/4″ x 10-1/4″ Score at 5-1/2″, 6-1/2″, 8-3/4″ and 9-3/4″
Boots Fold Base- Basic Black 2-3/4″ x 5-3/4″ Score at 4-1/4″ and 5-1/4″
Crumb Cake Hardwood Panel- 2-1/2″ x 4″
Paisley Panels- 3″ x 4″ and 2″ x 4″ You can stamp a 4″ x 5″ piece and cut to these measurements.
Stitched Shapes Oval- 3″ x 4″ and Boots Oval 3″ x 4″
Sentiment Banner- 1/2″ x 3″
Linen Thread- around 16″
Here is the LINK to the Oh So Eclectic card I did with this fun fold technique. I really liked how it turned out:)
Any Questions, please contact me at cindyleebee@gmail.com. You can shop ONLINE HERE 24/7.