Special Occasion

Stampin’ Up! Sale-a-bration Happy Birthday to You with NEW Birthday Dies coming on Feb. 4th

January 23, 2020

I have a sneak peek of the Birthday Dies coming out on February 4
with the Sale-a-bration Coordination!
They coordinate with the Happy Birthday to You Stamp Set available during Sale-a-bration.

With the Birthday Dies, you can die cut the cake, the flowers, the stand, and two sets of leaves.
Oh, look at those delicate leaves that are in the Birthday Dies:

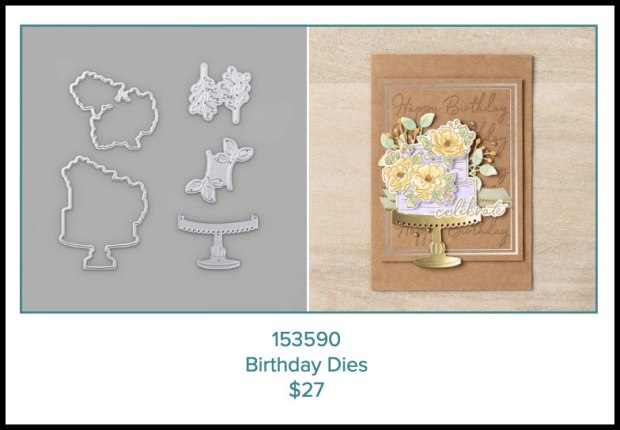
They are just gorgeous with embossing built in them!

The beautiful floral patterns in the Best Dressed Designer Series Paper pairs well with the flowers on the cake. Just 1-1/2″ x 5-1/4″ of DSP adds so much to the card. The Pear Pizzazz Panel is embossed with the Tufted 3D Embossing Folder. I was inspired to make this card from a shoebox swap card done by my friend, Cyndi Lott. She had an oval under the cake and did not use the cake stand, leaves, or strip by the DSP.  I changed it up a bit but wanted to thank Cyndi for the total inspiration- her card was stunning!

Because I used a white card base, I colored a die cut of the single flower at the top of the cake for the inside.  If I had colored directly on the card base with the alcohol based Stampin’ Blends, the ink would have bled through to the back of the card.


The Birthday Dies are available while supplies last starting on February 4th.

Thanks for stopping by, friends…


Product List

Stampin’ Up Path of Petals Wedding Fun Fold Card

November 6,2019

I love making fun fold cards..trying to find ways to make a card just a little different from the regular design. I used the Stampin’ Up Path of Petals Bundle to make one this wedding card.

The front of the card shows off the detailed Blushing Bride oval floral die cut that I embossed with the Subtle EF. I placed it on the Smoky Slate card base around the die cut  1-7/8″ x 2-3/4″ oval.  The Best Wishes sentiment that sits on a 1″ x 2″ oval framed by a Smoky Slate scallop oval. I added a Blushing Bride oval frame to the back of the opening on the Smoky Slate card base by die cutting a larger oval (2-1/8″ x  3″)  around a  smaller oval (1-1/2″ x 2-1/2″).

When the card opens, you can see the pretty Scripty embossed panel that the sentiment sits on.

When you open the card, there is an open area for the sentiment and a place to site you message.
You could easily attach a pocket for a check, cash or gift card on the back of the embossed panel.

Measurements:
Smoky Slate Card Base: 4-1/4″ x 11″ scored at 5-1/2″ on the 11″ side
Cut the gray scallop oval around the Blushing Bride sentiment oval out of the Ooal cut out of the front of the card base
Blushing Bride die cut on front: 4″ x 5-1/4″
Cut the Blushing Bride sentiment oval out of the negative from the oUtside large floral die cut
Blushing Bride Oval Frame: 2-1/2″ x 3-1/2″
Whisper White inside: 4″ x 10-1/2″ scored at 5-1/4″

Thanks for buzzing by, friends…


Product List

Blushing Bride Classic Stampin' Pad

Blushing Bride Classic Stampin’ Pad
[131172]

Stampin’ Up Flourishing Phrases with Hand Lettered Prose Dies

August 3, 2019

My daughter asked me for a card that was like “sending a hug” in the mail.
So…I did exactly what she asked me in the half hour before she wanted to pick it up…

When I made it, I die cut the hugs with the Hand Lettered Prose Dies and laid them on the panel I stamped with the Flourishing Phrases stamp set. It was too flat so I thought of little pieces of dimensionals but that would be tedious and not very stable. So I put the die cut letters on some white fun foam I had. I just die cut the hugs out of the fun foam, used Tombow glue to attatch the DSP hugs, and then glued them to the panel:) It looks so good! Now, if Stampin’ Up had sheets of dimensionals we could cut out shapes…that would be awesome!

I forgot to snap a pic of the inside…a simple repeat of the flourish in the lower right corner:)

Thanks for buzzing by, friends…


Product List

Stampin’ Up Delicate Lace Edgelits with Flourishing Phrases

April 26, 2019

Hello, friends! I have another neat card for you using the Delicate Lace Edgelits
with the Flourishing Phrases stamp set.

Lace is just so timeless…I think this pattern is just plain enough to suit most tastes without being to “fru-fru,” don’t you think?

NOTE: I cut my Very Vanilla panel on the front pf the card  to 3-3/4″ x 5-1/4″ and then cut right next to the edge with the die. That way, I had a nice amount of Pear Pizzazz peeking through since it is cut to 4″ x 5-1/4.” I also ran the Very Vanilla panel through the Big Shot with the Subtle Embossing Folder AFTER I die cut it. It gives it such a polished look.

I carried the lace edgelit and ribbon over to the inside. I was pleased how it looked:)

NOTE: I cut the inside Very Vanilla panel to 4″ x 5-1/4″ so I had more room to write a message.

Thanks for buzzing by, friends…


Product List

Leaf Punch

$16.00

Stampin’ Up Treehouse Adventure for Graduation

April 12, 2019

All my stamps make me happy but this one just makes me all warm and fuzzy…

Wouldn’t this make a grrrrrreat graduation card?
Although those grads want to be all grown up…but a secret part of them wants to stay a kid;)

I had so much fun playing with this stamp set, I am really glad I got it!

Thanks for buzzing by, friends…

I am almost to Charlotte for my Stampin’ Up Convention !!!!
I feel like a kid on Christmas Day!!!


Product List