Baby Shower

SU Moon Baby Pop Out Z-Fold Card

April 18, 2018

I don’t even have to tell you how I made this if you watched Monday’s video!
I used the same measurements but showed you how to make it with an oval this time.

I love lined images now that I can easily use my Stampin’ Blends to seamlessly color images.
Isn’t that Ivory Stampin’ Blend just perfect for the skin tone on the baby?
Stampin’ Blends will soon be back for ordering:)

I don’t have a lot of baby stamp sets, and I am sure this one will be used a lot.
I especially love the baby sleeping on the cresecent moon with his little behind popping up:)

The stars are grouped together far enough apart that that it was easy
to stamp just one on the edge of my front panel to fill in blank spots.
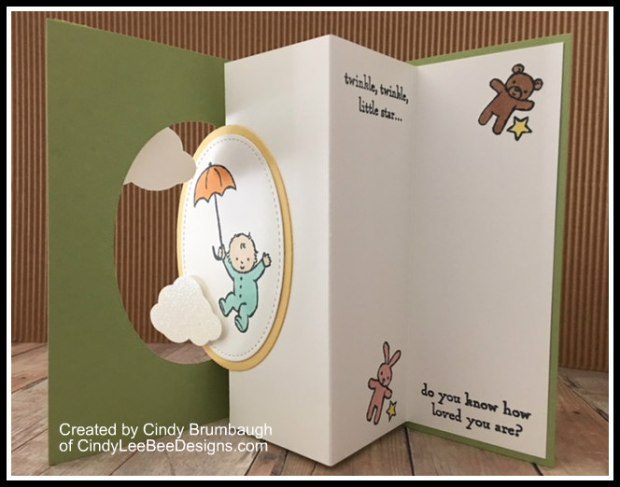
I actually cut the stuffed animals to stamp them separately.
I can always put them back together side by side if I want because I did not trim
the edges so they fit together like a puzzle piece.

And, HERE is a card I made a time ago with a square pop out…

Thanks for buzzing by, friends…

Use the Hostess Code at the top of the page to take advantage
of the BONUS GIFT for April…
a 1/2 pack of Picture Perfect Party DSP
and a card from me with a $30 order:)

Product List

SU A Little Wild Mash-Up

November 6, 2017

Oh my, I fell in love with the SU A Little Wild Bundle when I first saw it. It is such an adorable stamp set! Take a look at this video by Donna at the SU Home Office:

Here is a card I made with the Bundle:


*My DSP is 1-3/4″ x 5″ and the Pear Pizzazz border is 2″ x 5-1/4.”


Please note that this card was inspired by two talented demonstrators, Michelle Last and Sandy Mott. I got Michelle’s swap on my Thailand trip. Michelle’s watercoloring was awesome. Me, being not so adept at watercoloring, opted to simply use my super new alcohol markers, Stampin’ Blends! When I got a card from my friend Sandy, I also loved her color scheme and choice of DSP:) So, I mashed them up!

Product List

SU Totally Trees with Stitched Shapes Framelits

November 25, 2016

I was playing around with the SU Totally Trees stamp set this weekend…LOVE IT!

So many fun things to do with a set with this many images…

screen-shot-2016-11-15-at-2-39-43-pm

I also had the SU Stitched Shapes Framelits on my desk so I introduced them to each other, and this is what came out of it:

stampinup-totally-trees-with-stitched-shapes-framelits-created-by-cindy-brumbaugh-of-cindyleebeedesigns-com

I even invited two of the newer In Colors 2016-18- Flirty Flamingo and Peek-a-boo Peach to the party. I think they hit it off, don’t you think?

The sentiment is from SU Bunch of Blossoms stamp set. Don’t overlook this stamp set with its coordinating punch either! I really like the font used for the sentiments in this set and they fit in the Stitched Shapes Framelits, too…and the parts of the flowers kind of look like seashells and starfish to me.  Gotta love the stems, too. I need to make you a card soon to show it off, huh?

142345g

Product List

SU Foxy Friends with the Fox Builder Punch

August 6, 2016

I am playing along with the sketch at Freshly Made Sketches #248 created by one of my favorite designers, Linda Callahan.

FMS Final 248-001

I put the fox in for the shape and the DSP for the rectangle:)

I was inspired by a cute card by Sandra Mott where she cut the DSP into a row of foxes. If you attempt cutting the A Little Foxy DSP into rows of foxes remember they are not all the same size foxes. I am happy to say no foxes were harmed when I had to cut the DSP into 56 rows for my wonderful gals at classes this week!

SU Foxy Friends Welcome Baby

SU Foxy Friends Gray a Little Hello

Foxy Friends inside hearts
SU Foxy Friends two photos

This little fox is so cute! And that is not the only little critter you can make! Take a look at these cuties on Pinterest…https://www.pinterest.com/pin/108297566019480098/

Oh, I used the Duet Banner Punch and the Badges and Banners stamp set for the sentiment on both cards.

Product List

SU Something for Baby

April 26, 2016

A friend needed a baby card so I made up a quick one…no one knows if it is a boy or girl so yellow was a good choice! I was not sure if the scallops were too girly so I gave her a choice of plain arm and leg openings:) I think the Expressions Natural Elements (Congrats) were a great embellishment in this year’s annual catalog. Don’t forget to pick some up if you missed them as they are retiring!

I used some paper from the Cherry of Top DSP Pack- doesn’t it look like water?

SU Something for Baby Yellow Onesie

This fun onesie was so easy to make!

You just fold a 4 1/4″ x 11″ portrait card in half and punch half of a 1 3/8″ circle on the fold to create a head opening. Here is a sample, however the photo is out of order!

IMG_5343

You do the same for the leg holes but place the punch at each bottom corner like this:

IMG_5347IMG_5348

To make the body, place a ruler horizontally across the card 1 1/4″ from the top fold (below the head hole) and draw a line lightly with a pencil in 1″ on both sides. From the middle points of each line, draw a line down to the top of each leg hole. Cut along the lines to make it  the shape of a onesie.

IMG_5352

To make the trim on the collar and leg holes, punch out a 1 3/8″ circle then punch around the hole you created in the paper with a 1 3/4″  scallop or circle punch.

IMG_5350

Place the trim around the head and leg openings and trim off the excess.

*Thanks to Becky Jensen for her tutorial.

Product List