Measurements: Card Base=: 4-1/4″ x 11″ scored at 2-1/8″ on the 4-1/4″ side. On the 11″ side- score at 2″, 5-1/4″, 7-1/4″ and 10-1/2″. Cut as shown in video. Inside shelf to hold the house: 1-3/4″ x 5-1/4″ scored in 1″ on each side on 5-1/4″ side. DSP on front back and lower front panels: 1-5/8″ x 2-3/4″ bordered by 1-7/8″ x 3″ cardstock. DSP on the sides: 1-1/2″ x 1-5/8″ bordered by 1-3/4″ x 1-7/8″ cardstock. Back Whisper White Panel: 3″ x 4″
I have a Diorama Fun Fold for you today using the Stampin’ Up! Whale Done Bundle. Check out the video to see how easy it is to make:
Oh, the Whale of a Time Designer Series Paper is soooo bright and cheerful…just L-O-V-E it!!!
Just add some colorful ocean images on the back where you write your note, and you are done! .
Thanks for buzzing by, friends…
Measurements:
Cardstock Base: (2) 4-1/4″ x 5-1/2″ Shaded Spruce
Layering Oval: 2-1/2″ x 3-1/2″ to cut out a 1-7/8″ x 2-3/4″ oval with scallop border
Whale of the Time DSP: 3-1/4″ x 4″ for center panel, (4) 1/4″ x 4″ strips for the sides
Whisper White on back of card: 3-1/4″ x 4″
Scraps for Whale and sentiment
Here is a video showing you how easy it is to make this fun fold:
Pick two colors and make two cards. Then you can use the Layered Circle you cut out of the card base to die cut the Stitched Circle to sit your perfume bottle on:)
You get to see both sides of the Best Dressed Designer Series Paper on this card!
Measurements:
Card Base: 5-1/2″ x 8-1/2″ scored at 4-1/4″ and cut as seen in video
2-1/2″ square for Stitched Circle
DSP: 4-1/2″ x 5-1/4″ scored in 1/2″ on 4-1/2″ side
Whisper White: Inside 4″ x 5-1/4″ and 2-1/2″ square to stamp perfume bottle
Thin 1/16″ to 1/8″ x 11″ Strips of Cardstock to put on triangle edges
*I used a sentiment for the inside from the Beautiful You stamp set in the Annual Catalog.
NEWItems were added for the last week of SALE-A-BRATION 2020 in addition to the other items already in the line-up!
Spend $50 and pick one of these as a FREE gift!
Dinoroar DSP, Follow Your Art DSP, Woven Threads DSP, Shimmer Detailed Laser Cut Specialty Paper, 2 packages of Mini Shipping Boxes, Red Rhinestones, and Rococo Rose Stampin” Blends Combo Pack.
Measurements:
Card Base: 4-1/4″ x 8-1/2″ scored at 4-1/4″ on the 8-1/2″ side and then diagonally on one square
Night of Navy (or Cherry Cobbler) front panel: 4″ square
Gold Foil square: 3-1/4″ square
DSP on outside: 3″ square, inside 1-1/2″ x 4″
Inside Whisper White Panel: 4″ square
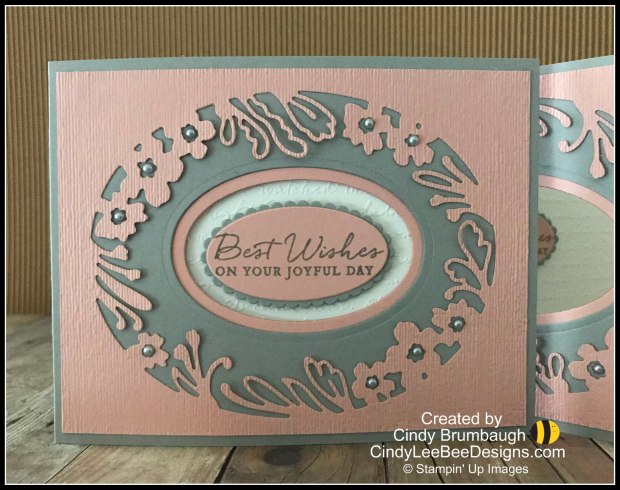
I love making fun fold cards..trying to find ways to make a card just a little different from the regular design. I used the Stampin’ Up Path of Petals Bundle to make one this wedding card.
The front of the card shows off the detailed Blushing Bride oval floral die cut that I embossed with the Subtle EF. I placed it on the Smoky Slate card base around the die cut 1-7/8″ x 2-3/4″ oval. The Best Wishes sentiment that sits on a 1″ x 2″ oval framed by a Smoky Slate scallop oval. I added a Blushing Bride oval frame to the back of the opening on the Smoky Slate card base by die cutting a larger oval (2-1/8″ x 3″) around a smaller oval (1-1/2″ x 2-1/2″).
When the card opens, you can see the pretty Scripty embossed panel that the sentiment sits on.
When you open the card, there is an open area for the sentiment and a place to site you message.
You could easily attach a pocket for a check, cash or gift card on the back of the embossed panel.
Measurements:
Smoky Slate Card Base: 4-1/4″ x 11″ scored at 5-1/2″ on the 11″ side
Cut the gray scallop oval around the Blushing Bride sentiment oval out of the Ooal cut out of the front of the card base
Blushing Bride die cut on front: 4″ x 5-1/4″
Cut the Blushing Bride sentiment oval out of the negative from the oUtside large floral die cut
Blushing Bride Oval Frame: 2-1/2″ x 3-1/2″
Whisper White inside: 4″ x 10-1/2″ scored at 5-1/4″


")


")


 Designer Series Paper")


")

 Designer Series Paper")


")
 Circle Punch")
 Specialty Designer Series Paper")